Schedule
Create an all-day event
Schedule work that can happen anytime on a given day, without picking a clock time.
What you will accomplish
You will turn on All day when you create an event on Schedule so the visit sits in the ALL DAY row instead of a timed hour slot.
Expected outcome: Your team sees the work on that date, can finish it whenever the day allows, and nobody is waiting for a 9:00 AM start that was never real.
When to use All day (instead of a time slot)
Use All day when the work is real, but the clock time does not matter.
- A battery tender walkthrough or storage check that staff can do anytime that day.
- A “hold this car for concours prep” day with no customer drop-off time.
- Internal shop work (inventory, bay reset) that should stay visible all day.
- A Calendar Block that closes the whole day so nobody else can book it.
Before you start
- Open Schedule.
- Know the date, the event type, and the vehicle or customer (if the work needs one).
- Write one short note about what “done” looks like, since there is no start time to explain the visit.
Create an all-day customer or vehicle event
- Open Schedule and click Schedule Event
Go to Schedule and click Schedule Event near the top-right.
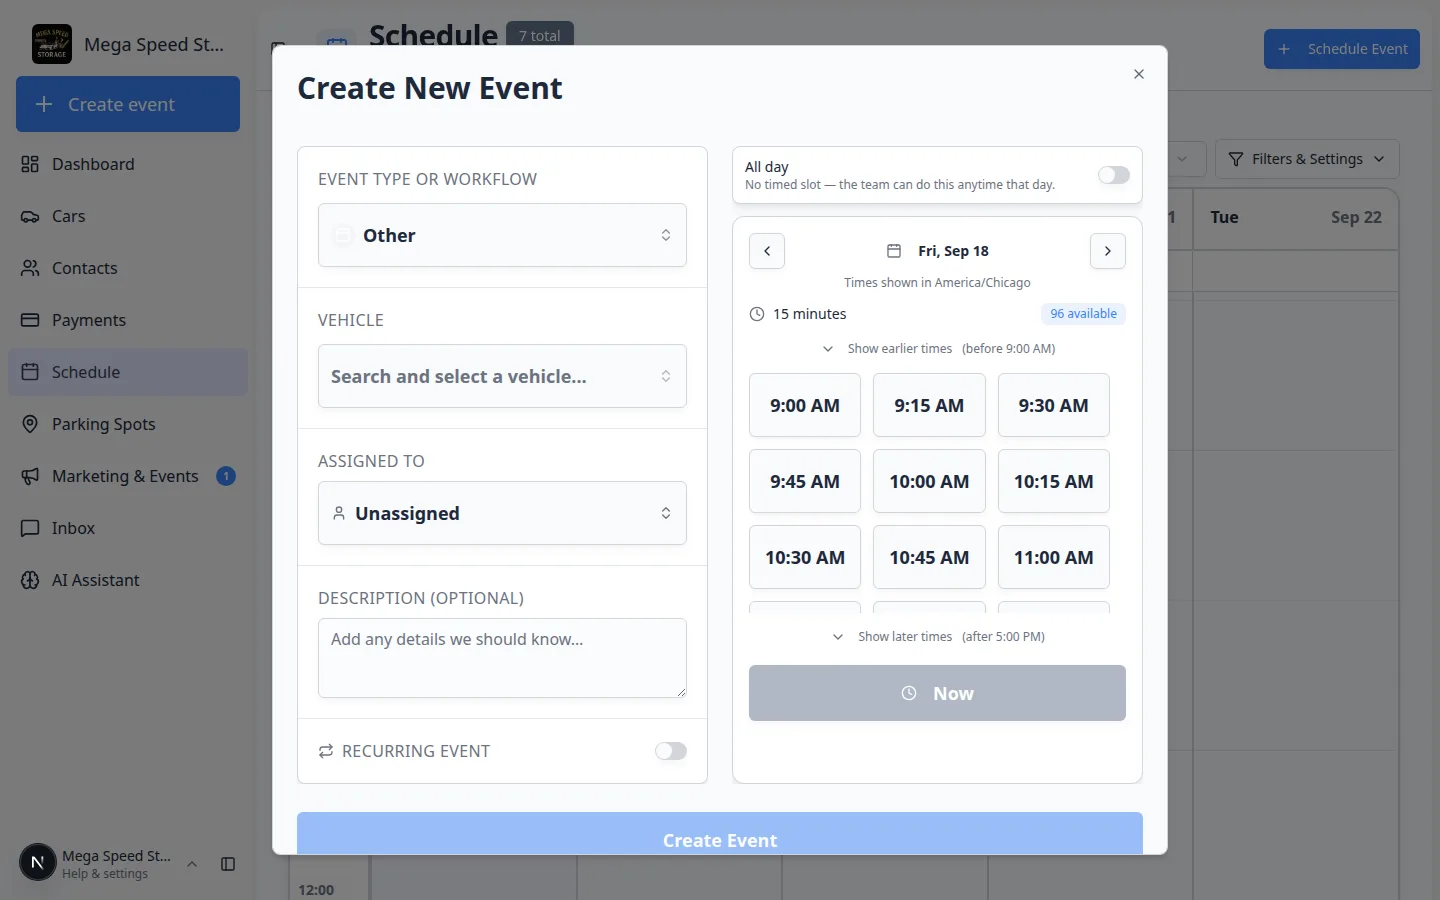
Expected result: A window titled Create New Event opens.
- Fill in the left side first
Choose the EVENT TYPE OR WORKFLOW (for example Internal Service), search for the VEHICLE if the work is about a car, set ASSIGNED TO if you already know who owns it, and add a DESCRIPTION (OPTIONAL) the next person can trust.
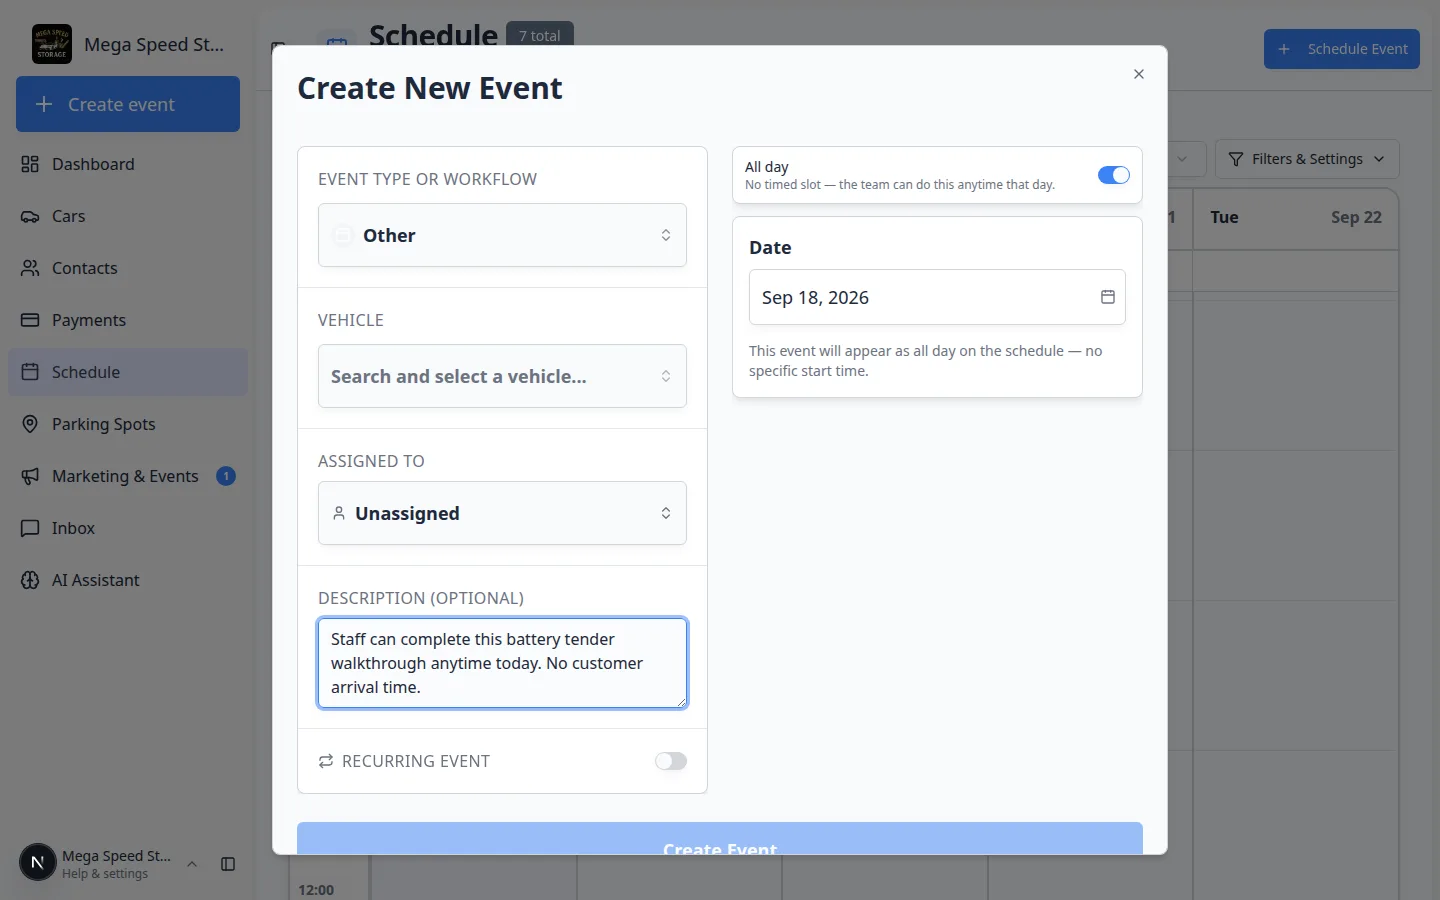
Why this matters: All-day work is easy to forget if the note is vague. A good note is “Complete the battery tender walkthrough anytime today. No customer arrival.”
- Find the All day switch on the right
Look at the right side of the window, above the date and time slots.
You will see All day with the helper text No timed slot — the team can do this anytime that day.
Expected result: Time slots are still visible while the switch is off. That is normal.
- Turn All day on
Click the All day switch so it moves to the on position.
Expected result: The time-slot grid disappears. A Date picker stays. Under it you see: This event will appear as all day on the schedule — no specific start time.
- Confirm the date
Use the Date field if you need a different day. Then click Create Event.
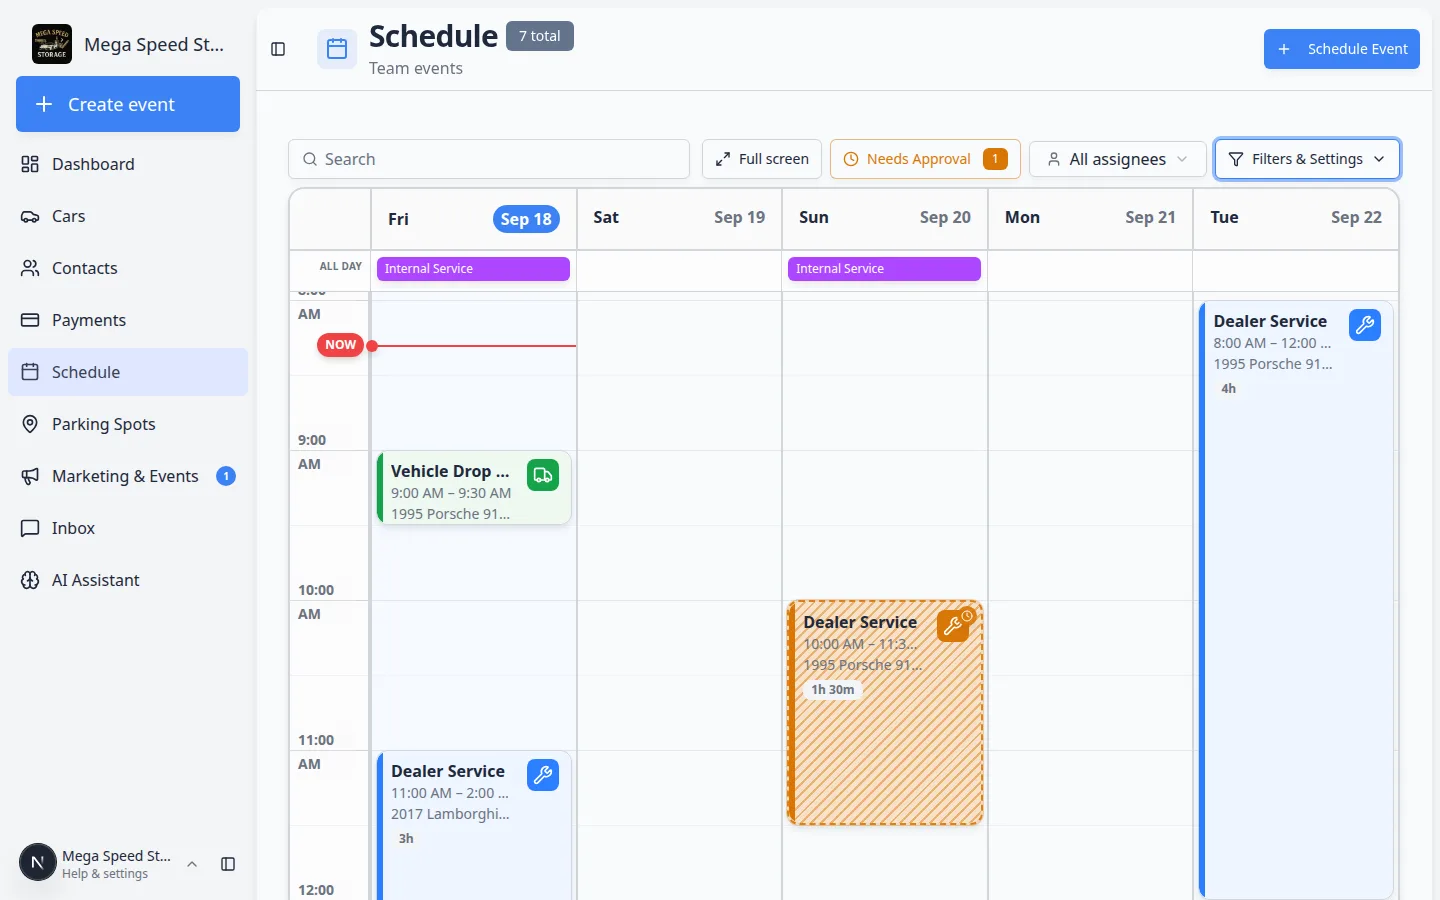
Expected result: The window closes. The event appears in the ALL DAY row on that date — not at 9:00 AM or 2:00 PM.
See it on the calendar
All-day work sits in its own lane so it does not hide timed visits.
- Stay in Calendar view
If you do not see a time grid, open Filters & Settings, choose Calendar, and pick 5 Day or 3 Day.
- Look at the ALL DAY row
At the top of the grid, above the hour lines, find the row labeled ALL DAY.
Expected result: Your all-day events appear as colored bars on that row. Timed visits stay in the hour columns below.
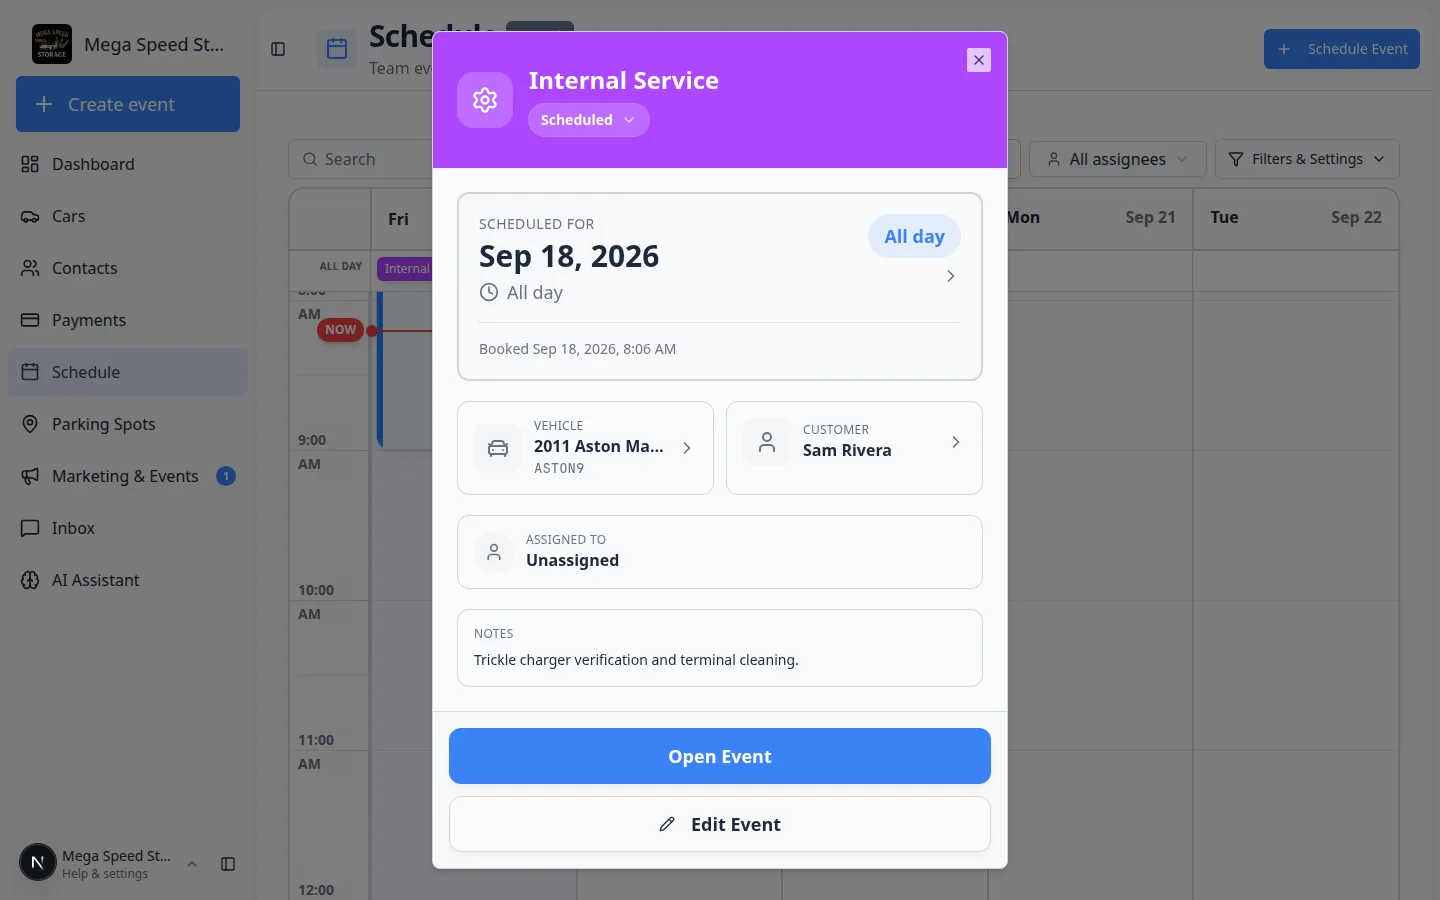
- Click the bar to read the details
Click the colored bar.
Expected result: The detail window shows SCHEDULED FOR the date, an All day badge, and the word All day next to the clock — not a start time like 10:00 AM.
Block a whole day (Calendar Block)
Use this when the shop should not accept bookings that day — training, a holiday, or a full bay reset.
- Click Schedule Event
On Schedule, click Schedule Event.
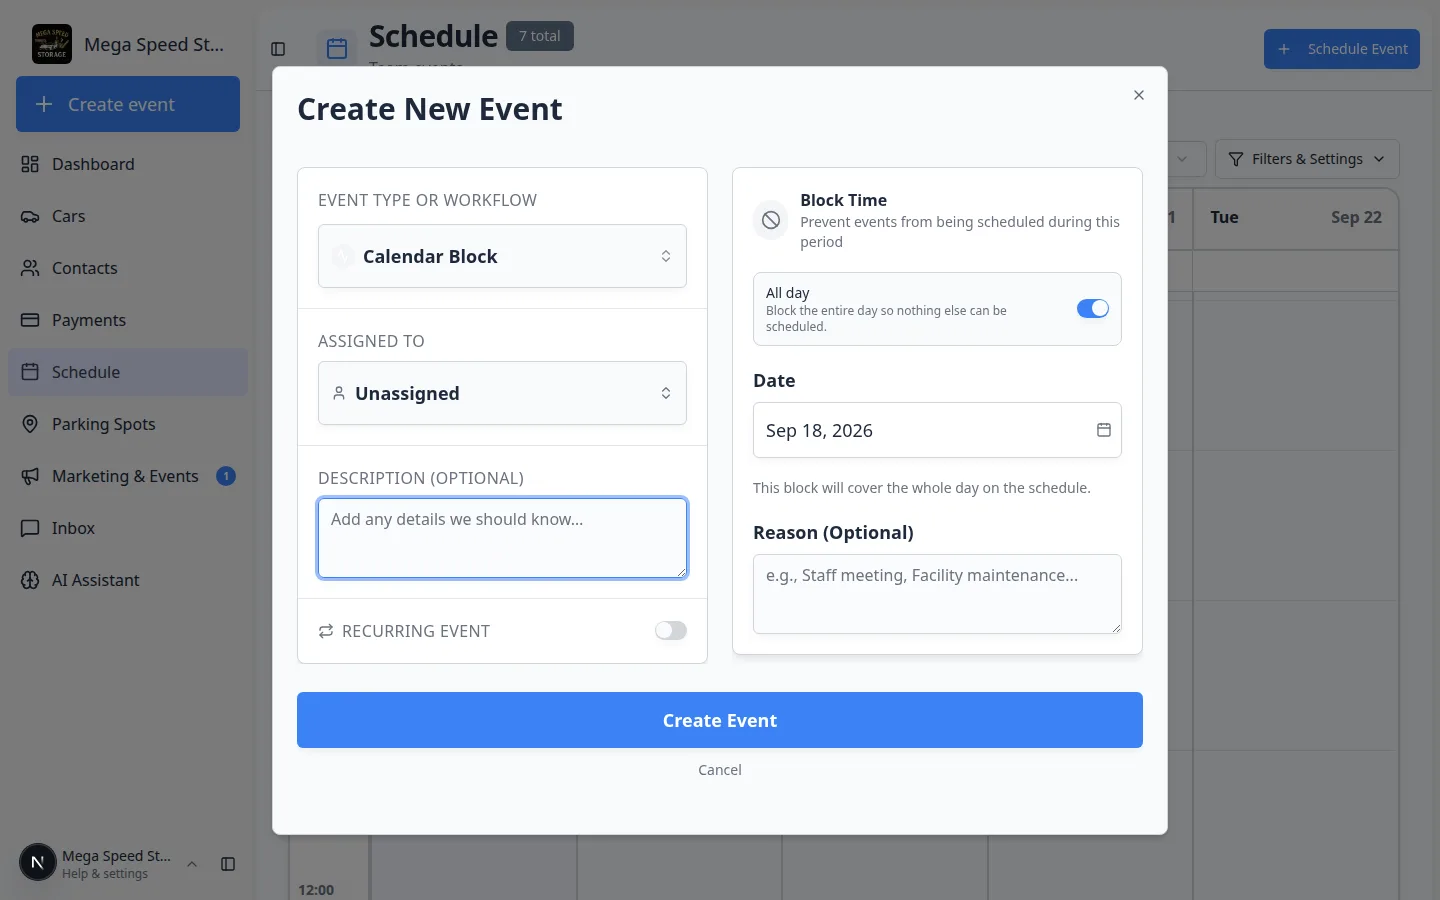
- Choose Calendar Block
In EVENT TYPE OR WORKFLOW, choose Calendar Block.
Expected result: The right side changes to Block Time with the note Prevent events from being scheduled during this period.
- Turn All day on
Turn on All day. The helper text says Block the entire day so nothing else can be scheduled.
Expected result: Start and end times disappear. You only pick a Date. Under the date you see This block will cover the whole day on the schedule.
- Add a Reason and click Create Event
In Reason (Optional), write something your team will understand, such as “Shop closed for team training and bay reset.” Then click Create Event.
Expected result: That date is blocked. Staff should not promise customer visits on it.
Change an all-day event later
- Open the event
Click the bar on the ALL DAY row.
- Click Edit Event
Use Edit Event to change the date, notes, assignee, or to turn All day off if the visit now has a real time.
- Do not rely on dragging
Timed events can often be dragged to a new hour. All-day events live in the top row, so changing the date is safer from Edit Event.
Why this matters: If a drag does not stick, the visit is not lost — open Edit Event and pick the new date.
For status changes (started, finished), use the status control at the top of the detail window or follow Update, assign, or reschedule an event.
Combine All day with a repeating series
You can turn on All day and RECURRING EVENT on the same form.
Example: a weekly battery tender walkthrough that has no customer arrival time.
Set the first Date, turn All day on, then turn RECURRING EVENT on and choose the repeat pattern. Full steps: Create recurring appointments.
What success looks like
- The event sits in the ALL DAY row on the correct date.
- The detail window shows All day, not a start time.
- Timed customer visits still have their own hour blocks underneath.
- Staff know they can finish the work anytime that day — and the note explains what “done” means.
Common mistakes
Troubleshooting
What to do next
- Put a timed visit on the calendar: Create an appointment
- Repeat the same all-day work every week: Create recurring appointments
- Run photos or checklists from the visit: Run event workflow from Schedule
- Return to Schedule overview