Cars
Record battery care and vehicle readings
Save battery tender notes, tire pressure, fuel, and odometer numbers on a car so the next teammate does not have to walk the lot.
Use this guide when a stored car needs battery care notes or the latest tire, fuel, and mileage numbers on its record.
These fields live on the car page so anyone can answer “Is the tender connected?” or “What was the last mileage?” without opening a paper clipboard.
What you will accomplish
You will fill in Battery Information and Vehicle Readings on one car so your team can protect the battery and track condition over time.
Expected outcome: The car record shows battery type and location, whether the customer left a charger, plus current tire pressure, fuel level, and odometer.
When to use this guide
- A car arrives for long-term storage and you need to know where the battery is and how to keep it charged.
- A customer asks you to connect their own trickle charger whenever the car is parked.
- You just finished an engine start or lot walk and want the latest mileage, fuel, or tire numbers on the record.
- Insurance or pickup staff need a recent odometer number without walking to the bay.
Before you start
- Open the correct car from Cars.
- Have the battery location, charger notes, and current readings from the car in front of you.
- If you do not see Battery Information or Vehicle Readings, ask a manager to turn those blocks on in the car detail page layout under Settings → Website & customer app.
Record battery care notes
Battery fields tell the next teammate how to keep a stored car ready to start.
- Open the car record
Go to Cars and click View on the vehicle.
Expected result: You see the year, make, and model at the top of the page.
- Scroll to Battery Information
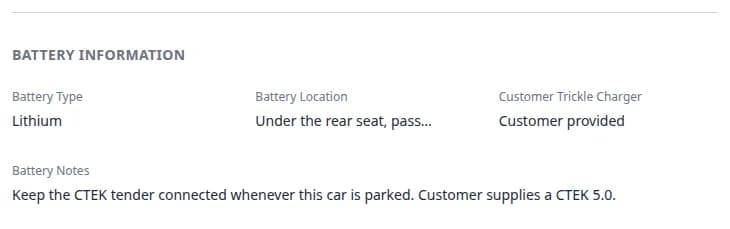
In Vehicle Details on the left, scroll until you see the heading BATTERY INFORMATION.
Expected result: You see Battery Type, Battery Location, Customer Trickle Charger, and Battery Notes.
- Choose Battery Type
Click Battery Type and pick one of:
- Lead Acid
- AGM
- Lithium
Click away to save.
Why this matters: Lithium and lead-acid batteries need different chargers. The wrong charger can damage a stored car.
- Describe Battery Location
Click Battery Location and type where staff should look—for example Under the rear seat, passenger side or Trunk, right side.
Expected result: The next person can find the battery without searching the whole car.
- Set Customer Trickle Charger
Click Customer Trickle Charger and choose:
- Customer provided — the owner left their own charger for you to use
- Not provided — your facility uses its own tender
- Not set — you do not know yet
Why this matters: Staff should not unplug a customer-owned charger and replace it with a different unit.
- Add Battery Notes
In Battery Notes, write the care rule in plain language. Example: Keep the CTEK tender connected whenever this car is parked. Customer supplies a CTEK 5.0.
Expected outcome: Anyone who opens the record knows what to do after a service visit or a move.
Record tire, fuel, and odometer readings
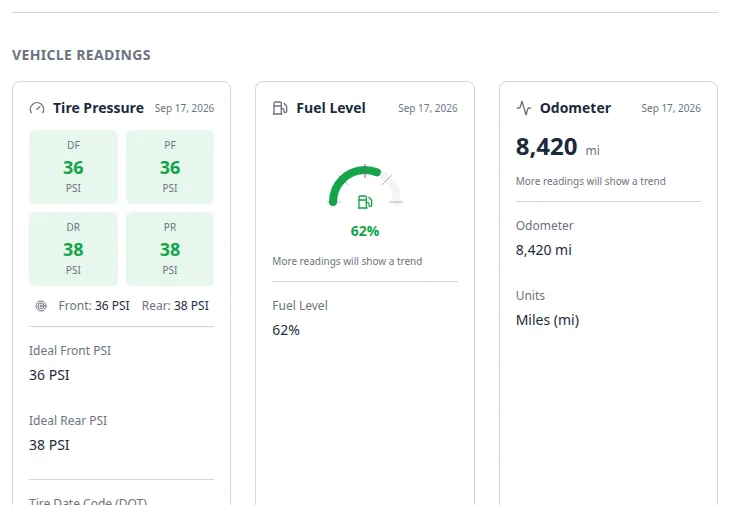
Vehicle Readings has three cards: Tire Pressure, Fuel Level, and Odometer.
- Scroll to Vehicle Readings
Stay on the same car page and scroll to VEHICLE READINGS.
Expected result: You see three cards side by side on a wide screen (they stack on a phone).
- Set the target tire pressures
On the Tire Pressure card, click Ideal Front PSI and Ideal Rear PSI. Type the pressures from the door sticker or owner’s manual (for example 36 front and 38 rear).
Optional: enter Tire Date Code (DOT) as the four-digit week-and-year code on the tire sidewall (for example 2319).
Why this matters: Later readings turn green when they are close to these targets, and yellow or red when they are not.
- Read the latest tire numbers
When a visit or lot walk has already saved pressures, the card shows DF, PF, DR, and PR (driver front, passenger front, driver rear, passenger rear) in PSI.
If you see No tire pressure data yet, log pressures during the next session or after a service-plan tire check. See Assign service plans on a vehicle.
- Update Fuel Level
On the Fuel Level card, click Fuel Level and type a number from 0 to 100. The card shows it as a percent (for example 62%).
Expected result: The gauge updates and the date on the card shows today.
- Update Odometer
On the Odometer card, click Odometer and type the current miles or kilometers. Use Units to choose Miles (mi) or Kilometers (km).
Expected outcome: The large number at the top of the card matches what is on the dash. After more readings, a small trend line appears.
What success looks like
- A teammate can find the battery and know which charger to use without calling the owner.
- Fuel, mileage, and tire targets are on the record before the next pickup or engine start.
- Service-plan checks such as Tire pressure or Engine start match the numbers you just saved.
Common mistakes to avoid
Troubleshooting
What to do next
- Attach recurring care (engine starts, tire checks) with Assign service plans on a vehicle.
- Capture photos and readings during a visit with Start a car session.
- Review other fields on the same page with View and edit vehicle details.