Marketing & Events
Create a social event
Publish an event with customer-facing details, RSVPs, tickets, and check-in support.
What you will accomplish
You will publish a customer-facing event with a name, date, time, location, and description. Customers can RSVP from their portal or a shared link. On event day, your team can check attendees in.
A social event is the right choice when people need a real date, a place to meet, and a way to say they are coming—not just a one-time email blast. If you only need to send a message, use Create a campaign instead.
When to use a social event
Use a social event (not a simple campaign) when customers need:
- A dedicated event page with date, time, and location.
- RSVP choices such as Going, Maybe, or Can't Go.
- Paid tickets or a maximum number of guests.
- QR or ticket check-in at the door.
Before you start
- Confirm the event name, date, time, location, and capacity.
- Decide whether the event is free or paid.
- Decide who may see the event: all customers, invited customers only, or anyone with a public link.
- Prepare a short description—what to expect, parking, and what to bring.
- For paid tickets, confirm payment processing in Settings > Billing.
Step 1: Open the event form
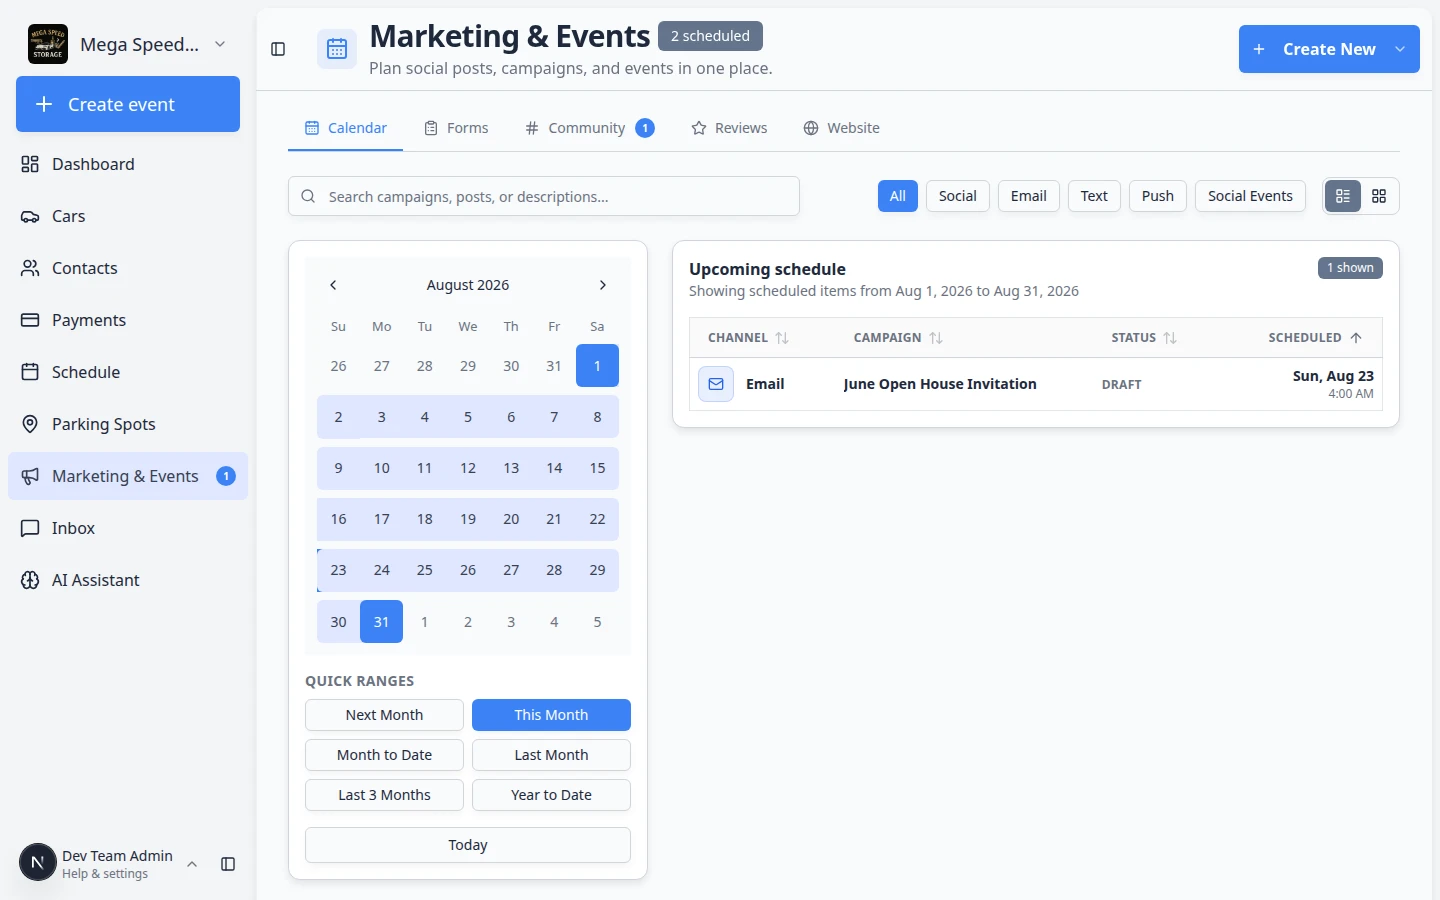
- Open Marketing & Events
From the dashboard sidebar, click Marketing & Events, or go to Marketing & Events.
Expected result: You see the Calendar tab with planned campaigns and events.
- Click Create New
Click Create New in the top-right corner of the page.
Expected result: A menu opens with message types (email, text, social post, and more).
- Choose Social Event
Click Social Event. A step-by-step Create social event wizard opens.
Why this matters: This starts the RSVP and check-in flow. Other menu items create campaigns or social posts instead.
Step 2: Walk through the creation wizard
The wizard has four short steps: Basics → When & where → Options → Review.
- Basics — name, photo, description
Type the Event name customers will see. Examples: Cars & Coffee Open House, Winter Storage Prep Night.
Upload an Event photo (optional) and write a short Description so guests know what to expect.
Click Continue.
Why this matters: This name appears on the calendar, in customer emails, and on the RSVP page.
- When & where — date, time, location
Pick a Start date & time in the future. The app will not save an event that starts in the past.
Click Add end time when the event has a clear end (for example 10:00 AM–1:00 PM).
Add a Location customers recognize (such as Main Lounge) and an Address for off-site events.
Click Continue.
- Options — capacity, cost, repeats
Turn on Recurring event only for monthly meetups. Leave it off for one-time open houses.
Use Max attendees when space is limited. Leave blank if there is no cap.
Enter Cost ($) for paid tickets, or leave blank for free events. You can add more ticket options after creating.
Turn on Custom theme colors only if this event needs its own page colors.
Click Continue.
- Review — check, then create
Confirm the summary looks right, then click Create social event.
Expected result: You land on the event detail page where you can add tickets, invite people, and share the RSVP link.
Step 3: Set who can see and RSVP
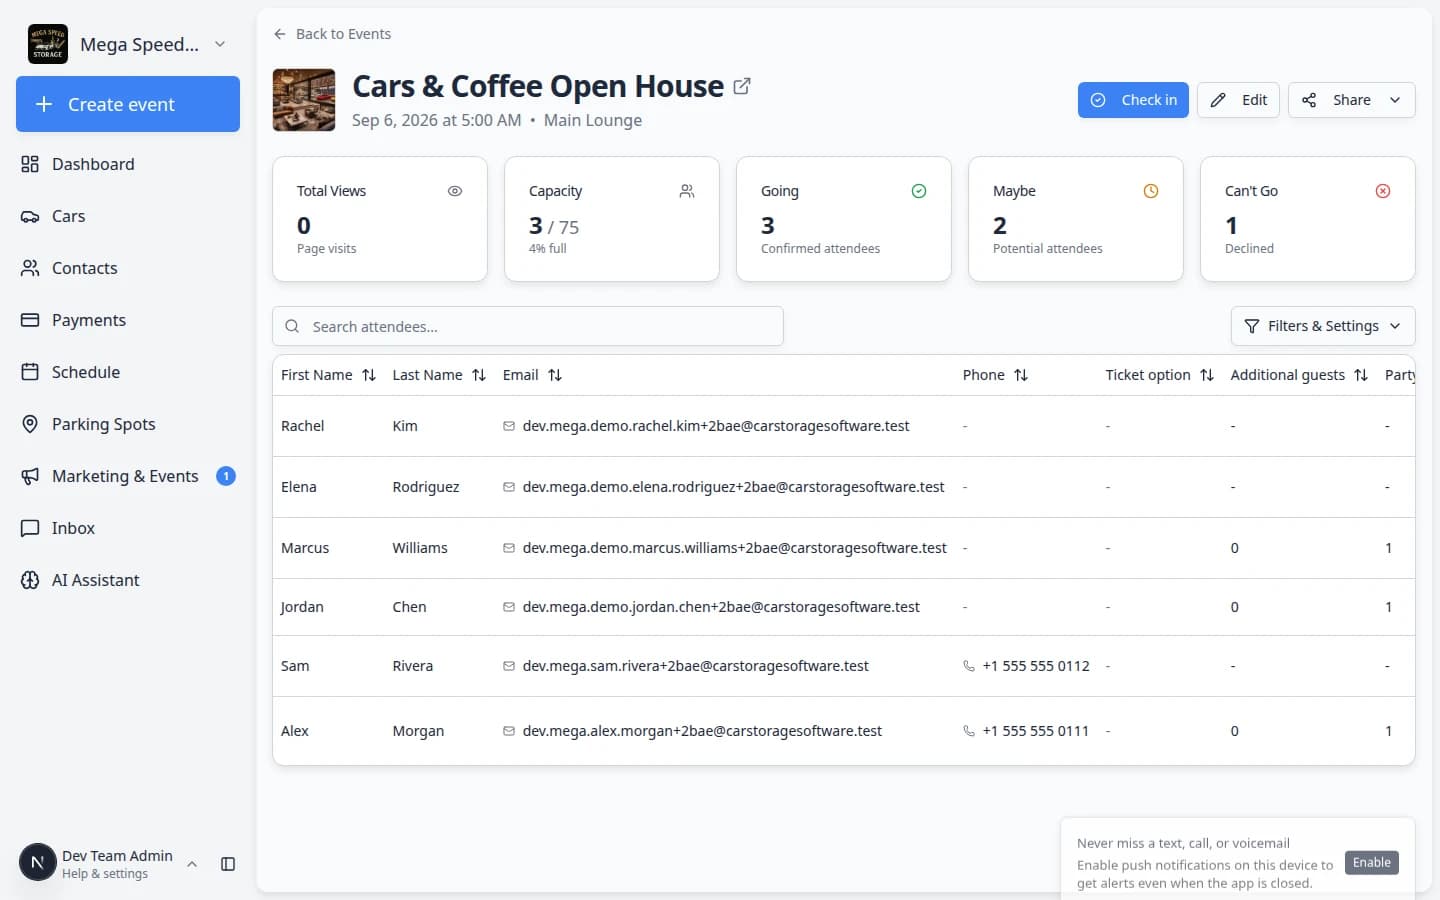
After the event is saved, you land on the event detail page (a link like /dashboard/social-events/ plus the event id).
- Click Edit
On the event detail page, click Edit.
- Choose Visibility
Find Visibility on the edit form and pick who may open the event page:
- Anyone with the link — anyone with the link can view and RSVP (good for open houses advertised on your website).
- Customers only — only signed-in portal customers can view and RSVP (good for member-only facility events).
- Invite only — only invited guests can view and RSVP (good for private gatherings).
Why this matters: Wrong visibility is the most common reason customers say they “cannot find” an event.
Expected result: A customers only event requires portal sign-in. An anyone with the link event works from a copied link in email or on your website.
- Set invite rules when you chose Invite only
If you picked Invite only, you will also see how guests get access:
- Invite link — anyone with the special invite link can open the page.
- Invite list — only customers you add to the invite list can RSVP.
Use Invite list when you want tight control over who may attend. Use Invite link when you will share one private link with a small group.
On the Edit page you can also use Bulk actions to invite many customers at once—filter by tag, invite everyone in the filtered list, or remove guests in bulk.
- Set ticket options for paid or limited events
Scroll down on the Edit page to find ticket and capacity options:
- Add option — create ticket tiers (for example General Admission and VIP Parking).
- Enable waitlist — let customers join a waitlist when the event is full.
- Allow multiple tickets — let one customer reserve more than one spot.
- Show link preview — control whether social apps show a preview image when the event link is shared.
Why this matters: These settings control how customers buy tickets and what they see before they RSVP.
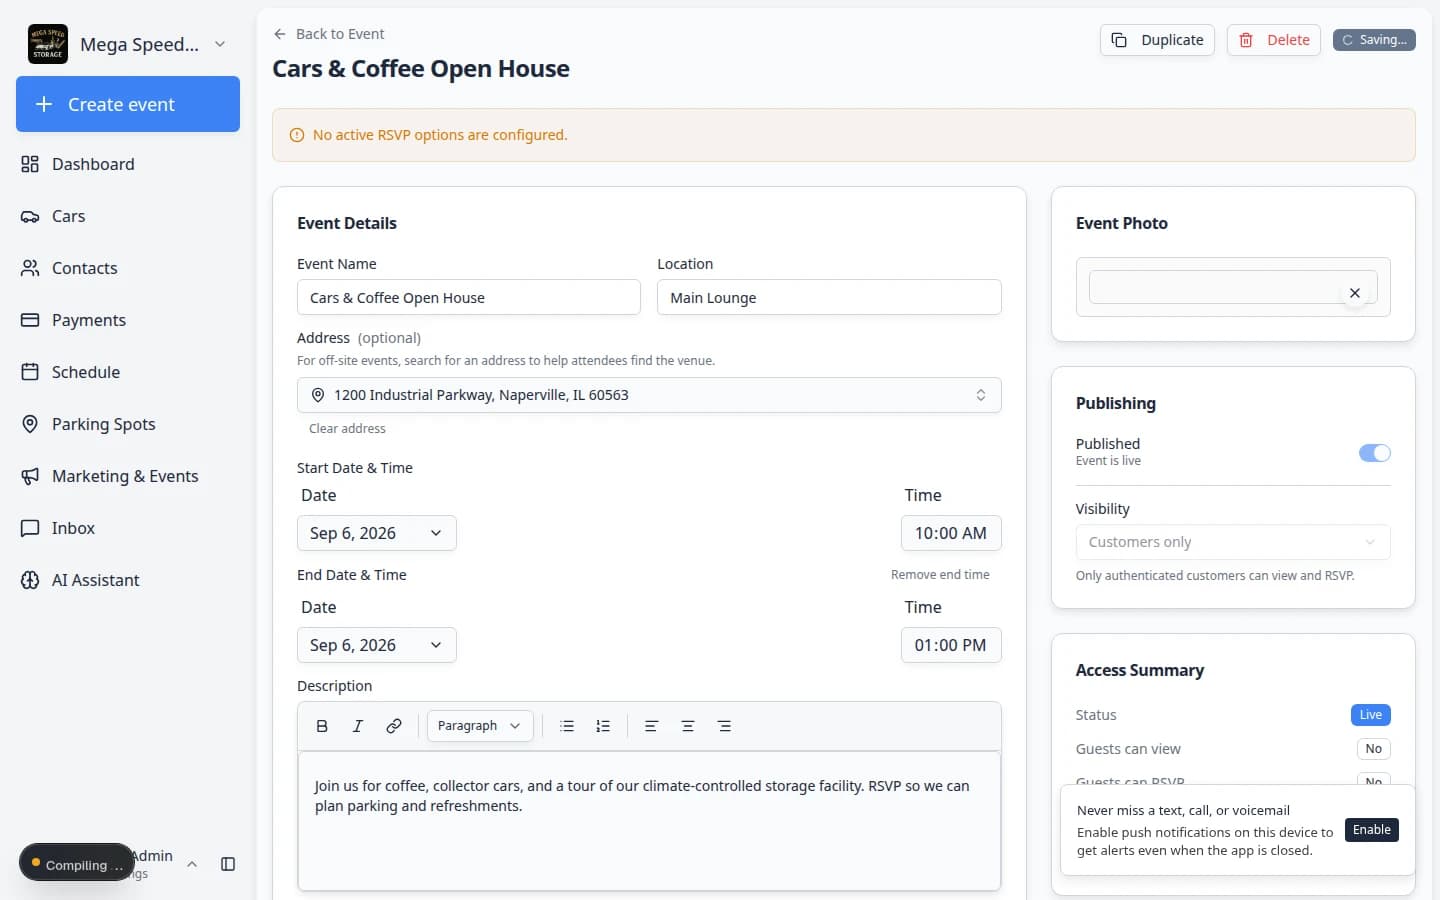
On the Edit page, scroll to ticket options when you need paid tiers, a waitlist, or multiple tickets per guest. - Save your changes
Save the event. Return to the detail page and confirm the settings look right.
Expected result: The event behaves the way you explained to customers (portal-only vs public link).
Step 4b: Preview what customers will see
Before you email hundreds of people, open the event the same way a customer would. This catches wrong dates, missing locations, and visibility mistakes early.
- Click Share, then Open link
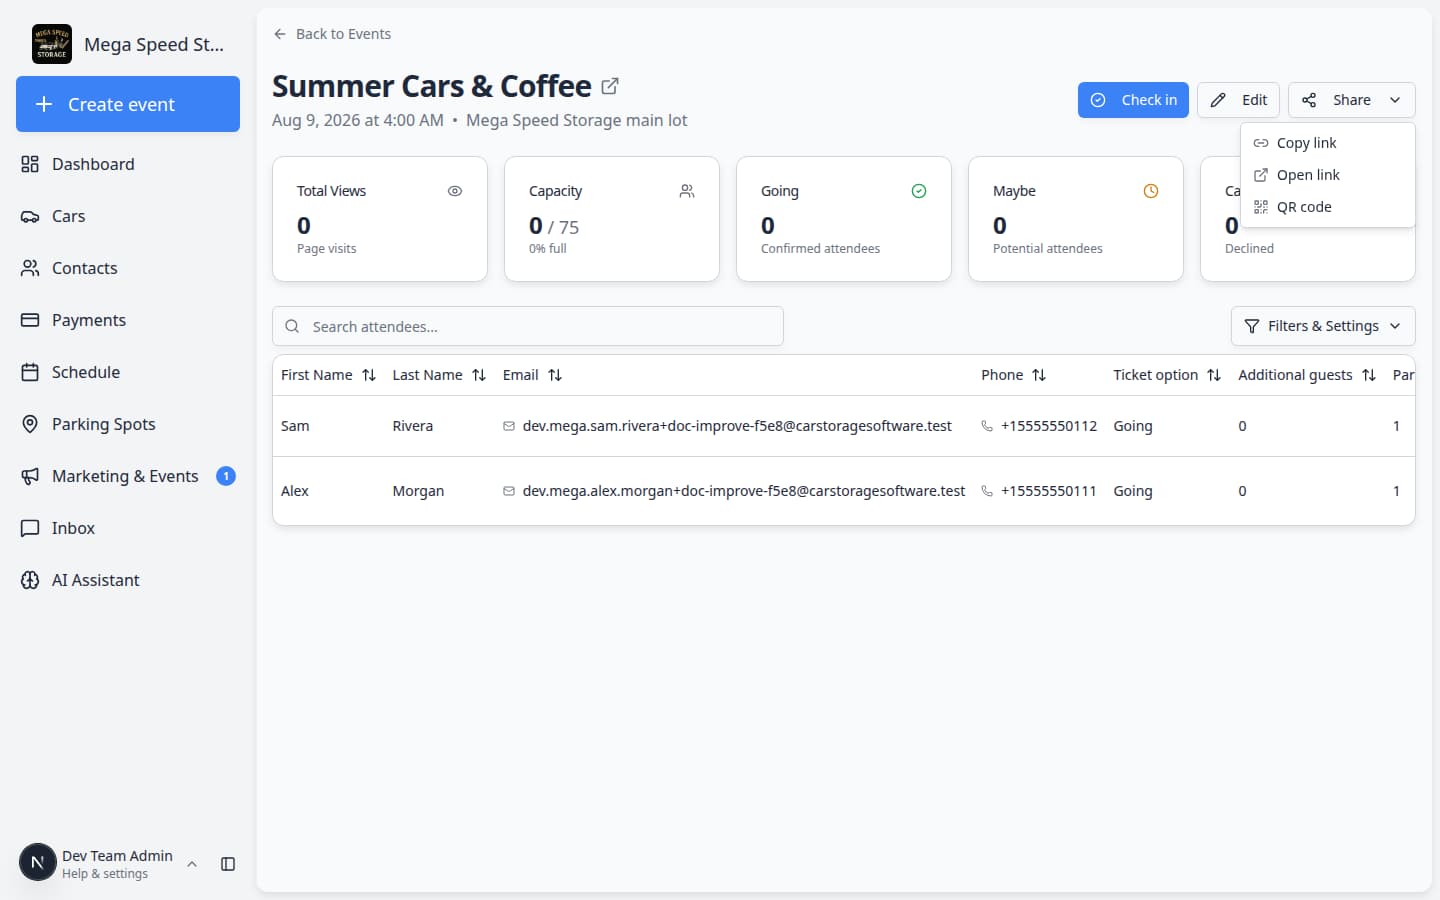
On the event detail page, click Share → Open link. A new browser tab opens with the customer-facing event page.
Expected result: You see the event photo (if you added one), name, date, time, location, and description—not your staff dashboard.
- Read the page like a customer
Check that the date and time match what you will say on the phone. Confirm the location name and address are easy to find.
Why this matters: Customers often decide whether to attend from this one page on their phone.
- Try the RSVP buttons
If you are signed in as staff, you may need a customer test account to submit an RSVP. Use a customer login link for a test customer, or ask a teammate to RSVP once.
Expected result: After a test RSVP, the Going count on the event detail page increases by one.
Step 4c: Guests, tickets, and questionnaires (optional)
On the event Edit page under Settings, you can:
- Additional guests — Let RSVP-ers bring extras by headcount only, or collect guest names and contact info. Choose whether extras are free or charged at the same price as the selected ticket option.
- Issue QR tickets — Turn this off when you want a confirmation screen instead of a QR code at check-in.
- Event questionnaire — Attach a custom form and choose whether attendees fill it out during RSVP or after RSVP. During RSVP, the questions appear inline on the event page (no separate form submit). After RSVP, attendees can save answers from the confirmation screen.
Use Duplicate on the edit page to clone an event as a draft (options and settings copy; RSVPs do not).
Recurring events
When you create a recurring event or generate more occurrences, new dates start as drafts (unpublished). Publish each occurrence when you want it on the customer calendar so series do not stay live indefinitely.
Pricing display
If a ticket option has no charge, the customer page does not show “Free” or $0—so dinner or hospitality events are not mistaken for complimentary meals.
Step 5: Share the event with customers
- Click Share
On the event detail page, click Share. A small menu opens.
- Choose how to share
Pick the option that fits your workflow:
- Copy link — paste into a text, email, or campaign.
- Open link — preview what customers see before you send it widely.
- QR code — print or display at the entrance so guests can scan and RSVP.
- Tell customers what to do
Ask them to open the link and choose Going, Maybe, or Can't Go so your counts stay accurate.
Step 6: Watch RSVPs before event day
- Review the summary cards
Check Total Views, Capacity, Going, Maybe, and Can't Go so you know how many people to expect and whether customers are opening the event page.
- Search attendees when the list grows
Use Search attendees... to find someone by name or email when they call your front desk.
For a full walkthrough of RSVP planning, read Review social event RSVPs and attendees.
What success looks like
- The event appears on Marketing & Events on the correct date.
- Visibility matches how you plan to promote the event (portal, public link, or invite only).
- At least one test RSVP updates the Going count on the detail page.
- Staff know where to open the event on event day for check-in.
Troubleshooting
What to do next
After you save the event, most facilities invite customers in this order:
- Click Share on the event detail page and copy the RSVP link.
- Create an email campaign that includes the link and a short description.
- Finish the message and audience in Add campaign message, audience, and publish.
- A few days before the event, follow Review social event RSVPs and attendees.
Before event day, you can also post the link in a community channel.
On event day, use Check in social event attendees.
After a great visit, consider Request and manage reviews.